Lists provides an easy and robust way of storing and manipulating data in SharePoint. When you set up a new custom list, you also get OOTB data entry forms to perform CRUD (Create, Read, Update, Delete) operations easily. However, most of the time we will need to customise those OOTB forms in order to make them more user-friendly for business users or implement some business rules to control the User interface.
Previously, the only way to customise List forms was by using [*PAPPS] but now Microsoft has introduced a new built-in form editor to do some quick customisations without using Power Apps or any other external tool. Today we will look at essentially what we can or can’t do by form editor feature and we will be using an Issue Tracker List scenario.
User Case Scenario
Create an Issue Tracker List which allows users to lodge new issues with some extra features including
- Hide the fields which are not required on the New Form.
- Group fields into different sections to simplify data entry.
- Show additional fields on the edit form to be filled by the assigned person.
AxioWorks SQList continuously export SharePoint lists and libraries as normalised SQL Server tables, making live SharePoint data available to reporting tools like Power BI, Crystal Reports, or SSRS.
Hide Fields using Conditional Formula
Let’s start off by creating a new List using the “Issue Tracker” template. Now we have a list with some predefined fields and OOTB forms.
Add a new multi-line text field called “Cause” for Assigned User to enter the issue root cause.
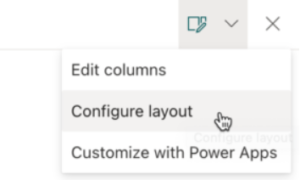
Now click on New Item. Once the form is open, you will see the settings dropdown at the top right corner of the form.

We have two options available, Edit Forms and Configure Layout
Edit Columns
This feature allows you to show/hide columns, move the field placement on the form and define conditions to control the field display mode. Now, there are certain fields that we don’t want to show up when a new issue is added by the user. Let’s Hide The AssignedTo, Status, and Cause fields when the user is adding a new Item using the formula below.
=if([$IssueSource] == ”, ‘false’, ‘true’)

Click Save. You will see those fields will be hidden from the form.

Group fields into different sections using Change Layout
In order to group the fields into different sections, we need to change the layout of form.

In the Format pane, you can choose to apply formatting to the following form sections:
- Header
- Body
- Footer
We can define our custom layouts using the Json format which is similar to Custom List View formatting. For our scenario, lets add the custom JSON below.
Now click on preview and you should see the updated Header.

To change the layout of the fields, Select Body and add the JSON below.
Now your form should look like this:
Now your form should look like this.

Show additional fields on the edit form to be filled by the assigned person
Create a new item in the issue tracker.
You will notice that some fields are not showing up in the Investigation Outcome section, that’s because we have made them hidden for a new form.
When you click on Edit, you will see the additional fields will appear on the form as well.

Now, we can set up a simple flow to assign the issue to the relevant person based on the IssueSource, and then the Assignee can add the details about the cause of the issue and change status once it’s fixed.
AxioWorks SQList continuously export SharePoint lists and libraries as normalised SQL Server tables, making live SharePoint data available to reporting tools like Power BI, Crystal Reports, or SSRS.
Conclusion
List forms provide a great platform to get started but soon you will get some additional requirements from the business users to make the forms more user-friendly be removing unnecessary fields or changing the layout to make it easier for users to fill in the data.
For complex forms, we will need a more sophisticated tool that provides more control over the UI and additional logic building features like PowerApps but this Edit Form feature is a super-easy way of editing SharePoint Forms including changing layouts and controlling which fields to show or hide based on conditions.


